Take the System Initiative

Table of Contents
Infrastructure as code is dead. Don’t believe me? Read on.
Odds are you’re familiar with infrastructure as code tools like Terraform, OpenTofu, and Pulumi. Maybe you like these tools and use them regularly. Maybe you have a love-hate relationship with them. Regardless, you feel some way about these tools. Have you ever stopped to wonder if there’s something better?
Answer the following questions for yourself.
- How quickly can you deploy infrastructure as code changes?
- How easily can you modify the upstream source code?
- Can you list all of the inputs, outputs, and dependencies for a resource?
- Do you have a high-level view of all your deployed resources?
For most people, the answers to those questions can be embarrassing. Let me answer them for myself so you can see what I mean.
- How quickly can you deploy infrastructure as code changes?
- However long it takes to get a code change reviewed and merged. Usually between minutes during working hours to hours or days otherwise.
- How easily can you modify the upstream source code?
- Not that easy. I would have to fork the source code, modify it, build it, deploy it, and get it hooked up to the infrastructure as code tool. Would take more code reviews and possibly hours or days for the configuration.
- Can you list all of the inputs, outputs, and dependencies for a resource?
- If everything is in the same code repository then probably with a good
Language Server Protocol (LSP) configuration. Otherwise, I’ll be using the
documentation and good ole’
grep.
- If everything is in the same code repository then probably with a good
Language Server Protocol (LSP) configuration. Otherwise, I’ll be using the
documentation and good ole’
- Do you have a high-level view of all your deployed resources?
- Yes for those that are managed with some orchestration tool like Terraform Cloud, Spacelift, or Pulumi Cloud. Everything else would require reading state files or the like to build a graph of resources.
Sounds toilsome, doesn’t it?
It’s Time to Rebuild DevOps #
In my opinion, much of the infrastructure as code pain comes from the fact that the incumbent tools tightly couple themselves to a version control system. That is, all of the toil of version control systems is inherent in the design of infrastructure as code. It’s time to think about this differently. It’s time to rebuild DevOps. Thankfully, one company is doing just that- and that company is System Initiative.
System Initiative abandons infrastructure as code for infrastructure as models and it’s unlike anything I’ve worked with thus far. The interface is an interactive architecture diagram that forms a graph whose nodes and edges are powered by reactive, configurable functions. I know that sounds a bit like technical workplay so let me use more plain language. Imagine being able to click on a resource in your architecture diagram, edit the code that manages it, and view a dry-run of the results before deciding to apply those changes. That’s System Initiative, and its extensibility and short feedback loop are so refreshing compared to incumbent tools.
The following image shows what one of those architecture diagrams looks like on the System Initiative canvas.

This canvas manages resources on an Oxide computer. Mind you, System Initiative didn’t ship with support for managing Oxide resources. I added that support from scratch in under 30 minutes. More on that later.
Do you see the power yet?
System Initiative Concepts #
Before I show you how I added support for those Oxide resources let’s talk about the concepts in System Initiative. In System Initiative, you create an asset to manage a resource. Assets can have one or more functions attached to them, and those functions can be one of the following types.
- Action - Performs an operation on an asset. Typically these are create, read, update, and delete (CRUD) operations but can be customized to perform any operation (e.g., restart an instance).
- Attribute - Sets a value for an attribute on the asset (e.g., name, ID). Can be used to populate input and output sockets for use by other assets.
- Authentication - Configures authentication for an asset so that the asset can communication with an upstream API.
- Code Generation - Converts information about an asset into other formats (e.g., JSON, YAML) that can be used in other functions.
- Qualification - Validates information about an asset (e.g., valid region). Used to block potentially dangerous operations.
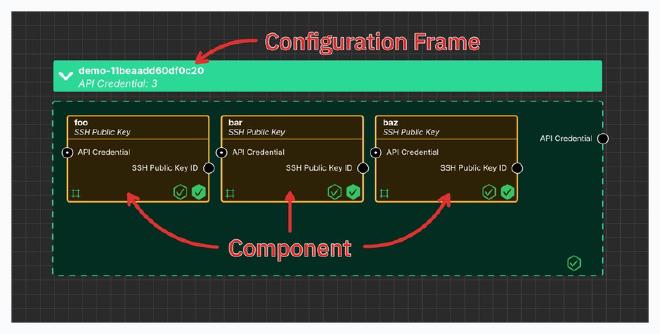
When you place an asset on the canvas it can either be a component or a configuration frame. Here’s the general difference between the two.
- Component - Asset that manages a resource. Can have input and output sockets connecting to and from other assets. Cannot contain nested assets.
- Configuration Frame - Asset that can contain nested assets. Any child asset will automatically have its input sockets populated from the output sockets of its parent. Can also manage a resource if desired.
The following image shows what components and configuration frames look like on the System Initiative canvas.

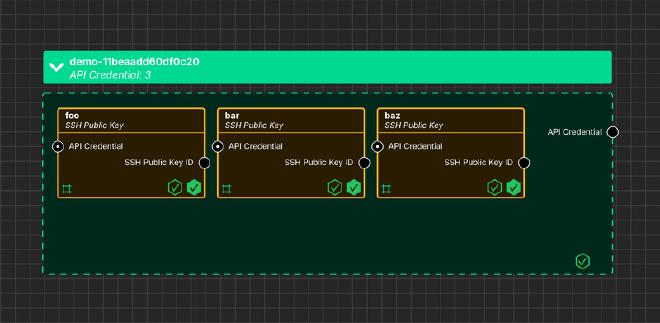
This canvas has one API Credential configuration frame with three SSH Public Key components nested within. The API Credential configuration frame has an
output socket named API Credential and the SSH Public Key components accept
an input socket named API Credential. Since the components are nested within
the configuration frame, the API Credential input sockets are automatically
populated from the output socket.
A quick note on input and output sockets. Using the analogy of a function in programming, input sockets are like function arguments and output sockets are like function returns. I won’t cover them much more in this post but that should be enough to build a good mental model.
Developing Assets #
System Initiative ships with built-in support for many AWS assets with more launching each week. However, System Initiative is meant to be extensible via a fast feedback loop and I wanted to see just how fast that feedback loop was by developing new assets.
My friends over at Oxide gave me access to a preview environment so I decided to develop new System Initiative assets to manage Oxide resources. I was going into this completely from scratch with zero context. I’ve never developed an asset in System Initiative before and I haven’t used the Oxide API.
As you now know, assets are just a collection of functions. There’s nothing stopping us from modifying existing assets or creating entirely new assets of our own. We only need to know how to write TypeScript functions. Having written infrastructure as code providers previously I expected to spend hours creating these new Oxide assets. Nope! In under 30 minutes I was able to develop the following new Oxide assets with support for create, read, and delete operations.
Oxide API Credential- A configuration frame to hold API credentials to communicate with the Oxide API.Oxide SSH Public Key- A component to manage an SSH public key.
Think about that for a second. 30 minutes to develop completely new assets. That’s mind-blowingly fast considering I started from scratch.
A note on updating assets. Keen readers may have noticed I didn’t list update as an operation I implemented. This is because at the time of this writing the update functionality in System Initiative is under active development and not yet exposed to users.
Before I show you the code for these assets I wanted to backtrack to function types. Earlier I said there were five function types but there’s really one more function type that every asset must have. I don’t believe there’s an official name for this function type so I’m going to call it the model function type for the sake of this post. The purpose of this function is to define the structure of an asset using properties. There are different types of properties in System Initiative (e.g., properties, secrets, input and output sockets) but I won’t go into too much detail about them in this post.
Oxide API Credential #
The first asset I created was Oxide API Credential. Initially I configured it
as a component but after some thinking I switched it to a configuration frame
so I can nest other assets within. Don’t fret about this too much, a user can
select whether an asset is a component or a configuration frame when they place
it on the canvas. The asset author just gets to configure the default type.
Let’s see what the code looks like.
The following model function defines one secret property named API Credential
with two child properties named API Token and Endpoint that will be set by
the user on the canvas. If the API Credential name sounds familiar to you its
because I mentioned it earlier when talking about input and output sockets. The
secret property is special in System Initiative- it’s also an output socket.
function main() {
    const apiCredentialSecret = new SecretDefinitionBuilder()
        .setName("API Credential")
        .addProp(
            new PropBuilder()
            .setName("API Token")
            .setKind("string")
            .setWidget(
                new PropWidgetDefinitionBuilder()
                .setKind("password")
                .build()
            ).build())
        .addProp(
            new PropBuilder()
            .setName("Endpoint")
            .setKind("string")
            .setWidget(
                new PropWidgetDefinitionBuilder()
                .setKind("text")
                .build()
            ).build())
        .build();

    return new AssetBuilder()
        .defineSecret(apiCredentialSecret)
        .build();
}
Since this asset will hold authentication information I created the following
authentication function that reads the API Token and Endpoint from the
secret created in the model function and stores them in request-scoped storage
for the asset. This request-scoped storage is accessible by all the functions
in the asset during execution.
async function main(secret: Input): Promise < Output > {
    console.log("Configuring API Credential...")
    requestStorage.setEnv("OXIDE_TOKEN", secret["API Token"]);
    requestStorage.setEnv("OXIDE_HOST", secret["Endpoint"]);
}
I used the following qualification function to validate that the Oxide API is reachable with valid credentials. It retrieves the API token and endpoint from the request-scoped storage and uses them to make an API request to the Oxide API. If no error is reached the qualification succeeds and lets this asset and its dependencies continue execution. In the System Initiative interfaces there’s a Function Depends on Secrets toggle to let System Initiative know to run the authentication function before the qualification function. Make sure to enable that.
async function main(component: Input): Promise < Output > {
    const apiToken = requestStorage.getEnv("OXIDE_TOKEN");
    const host = requestStorage.getEnv("OXIDE_HOST");

    if ((!apiToken) && (!host)) {
        return {
            result: 'failure',
            message: 'Oxide API token and host must be set!'
        };
    }

    const apiURL = `${host}/v1/me`;

    const response = await fetch(apiURL, {
        method: "GET",
        headers: {
            "Authorization": `Bearer ${apiToken}`
        }
    });

    if (!response.ok) {
        const data = await response.text()

        return {
            result: 'failure',
            message: `HTTP error! Status: ${response.status}, Body: ${data}`
        };
    }

    return {
        result: 'success',
        message: 'API Credential qualified!'
    };
}
Oxide SSH Public Key #
The second asset I created was Oxide SSH Public Key. This is a component that
manages an SSH public key within Oxide. Let’s see what the code looks like.
This action function creates an SSH public key. In the System Initiative
interface there’s a This action creates a resource toggle to let System
Initiative know this function creates a resource. Make sure to enable that.
Notice the function returns the API response via the payload attribute. We’ll
use that in other functions.
async function main(component: Input): Promise < Output > {
    const apiToken = requestStorage.getEnv("OXIDE_TOKEN");
    const host = requestStorage.getEnv("OXIDE_HOST");

    if ((!apiToken) && (!host)) {
        return {
            status: "error",
            message: "Oxide API token and host must be set!"
        };
    }

    const apiURL = `${host}/v1/me/ssh-keys`;

    const payload = {
        "name": component.properties.domain?.Name,
        "description": component.properties.domain?.Description,
        "public_key": component.properties.domain?.["Public Key"]
    };

    const response = await fetch(`${apiURL}`, {
        method: "POST",
        headers: {
            "Authorization": `Bearer ${apiToken}`,
            "Content-Type": "application/json"
        },
        body: JSON.stringify(payload)
    });

    if (!response.ok) {
        const data = await response.text()
        return {
            status: "error",
            message: `Error from Oxide API: Status: ${response.status}, Body: ${data}`
        }
    }

    const data = await response.json()

    return {
        payload: data,
        status: "ok"
    };
}
This action function reads an SSH public key. In the System Initiative interface there’s a This action refreshes a resource toggle to let System Initiative know this function reads a resource. Make sure to enable that.
async function main(component: Input): Promise < Output > {
    const apiToken = requestStorage.getEnv("OXIDE_TOKEN");
    const host = requestStorage.getEnv("OXIDE_HOST");

    if ((!apiToken) && (!host)) {
        return {
            status: "error",
            message: "Oxide API token and host must be set!"
        };
    }

    const sshPublicKeyID = component.properties.resource?.payload?.id

    if (!sshPublicKeyID) {
        return {
            status: "error",
            message: "SSH public key ID must be provided!"
        };
    }

    const apiURL = `${host}/v1/me/ssh-keys/${sshPublicKeyID}`;

    const response = await fetch(`${apiURL}`, {
        method: "GET",
        headers: {
            "Authorization": `Bearer ${apiToken}`
        }
    });

    if (!response.ok) {
        const data = await response.text()
        return {
            status: "error",
            message: `Error from Oxide API: Status: ${response.status}, Body: ${data}`
        }
    }

    const data = await response.json()

    return {
        payload: data,
        status: "ok"
    };
}
Remember that payload we returned in the create function? We use it in this
refresh function to pull out the ID of the SSH public key. We need that ID to
fetch the correct SSH public key.
const sshPublicKeyID = component.properties.resource?.payload?.id
This action function deletes an SSH public key. In the System Initiative interface there’s a This action deletes a resource toggle to let System Initiative know this function deletes a resource. Make sure to enable that.
async function main(component: Input): Promise < Output > {
    const apiToken = requestStorage.getEnv("OXIDE_TOKEN");
    const host = requestStorage.getEnv("OXIDE_HOST");

    if ((!apiToken) && (!host)) {
        return {
            status: "error",
            message: "Oxide API token and host must be set!"
        };
    }

    const sshPublicKeyID = component.properties.resource?.payload?.id

    if (!sshPublicKeyID) {
        return {
            status: "error",
            message: "SSH public key ID must be provided!"
        };
    }

    const apiURL = `${host}/v1/me/ssh-keys/${sshPublicKeyID}`;

    const response = await fetch(`${apiURL}`, {
        method: "DELETE",
        headers: {
            "Authorization": `Bearer ${apiToken}`
        }
    });

    if (!response.ok) {
        const data = await response.text()
        return {
            status: "error",
            message: `Error from Oxide API: Status: ${response.status}, Body: ${data}`
        }
    }

    return {
        status: "ok"
    };
}
Much like the refresh function, this delete function retrieves the ID for the
SSH public key from payload. Notice that this delete function does not return
any payload itself. That’s because at this point the resource will have been
deleted so there’s no payload to return.
Finished Canvas #
The following image shows the Oxide API Credential and Oxide SSH Public Key
assets on the System Initiative canvas.

Are You Ready to Take the System Initiative? #
I hope you can see just how powerful a tool like System Initiative can be in the hands of an engineer. Perhaps you’re already thinking of assets that you’d write to integrate with the tools you use.
If you’re ready to take the System Initiative, go ahead and sign up on their website. There’s even a Discord server if you’d like to be part of the community. If that’s too much commitment but you still want to support System Initiative then go ahead and give a listen to the The diagram IS the code episode where two engineers from System Initiative discuss more about the platform and its architecture.
Thank you System Initiative for giving me early access to the beta. I look forward to the eventual public launch and will continue to port my existing infrastructure over to System Initiative as I get the time to.
For my dear reader, are you ready to take the System Initiative?